Category: software-development

Software development is the process of conceiving, specifying, designing, programming, documenting, testing, and bug fixing involved in creating and maintaining applications, frameworks, or other software components. Software development involves writing and maintaining the source code, but in a broader sense, it includes all processes from the conception of the desired software through to the final manifestation of the software, typically in a planned and structured process. Software development also includes research, new development, prototyping, modification, reuse, re-engineering, maintenance, or any other activities that result in software products.

  • First Git Commit in GitHub

    First Git Commit in GitHub

    Git is very important tool for all kinds of software development and source code management. To make your first git commit in GitHub actually not that hard.

    Create A New Repository

    √ Visit https://github.com and signup for a new account. If you already have one, please sign in.

    √ Create a new repository by clicking this link https://github.com/new

    First Commit in GitHub

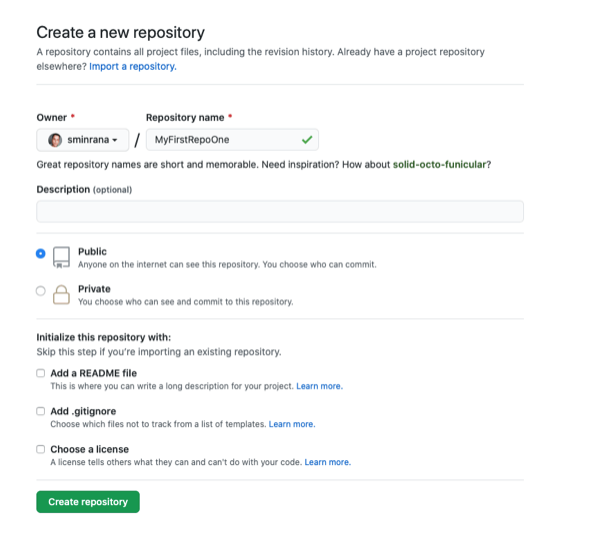
    Don’t forget to click the “Create repository” button.

    Install git on your computer 

    √ For Windows user click here https://git-scm.com/download/win. After download please install the Git.exe. Make sure Git Bash also gets installed. 

    First Commit in GitHub

    √ For Ubuntu user run this command on your terminal. 

    sudo apt-get install git
    

    √ For Mac user run this Homebrew command your terminal

    brew install git

    Create an SSH Key and Add in your GitHub

    On Windows open git bash and run command 

    ssh-keygen -t rsa -C "[email protected]"

    On Linux or Mac run terminal and run command 

    ssh-keygen -t rsa -C "[email protected]"

    Give a new file path when it says “Enter file in which to save the key”.  The press enter.

    It will create two keys in your .ssh directory one is private which has no extension and one is public which .pub extension. Now open .pub key in any text editor and select all and copy the content in your clipboard. 

    Go here https://github.com/settings/keys and click the button on the top-right New SSH Key.

    First Commit in GitHub

    Now paste your the content you copied from .pub file and paste in the key. Also give a nice title.

    First Commit in GitHub

    Finally click the button Add SSH Key to finish the process.

    Clone Your Empty Repository

    Now open your repository page and copy the repository url, make sure you select SSH.

    First Commit in GitHub

    Now open your terminal and run command

    git clone git@your_git_url

    in my case it is 

    git clone [email protected]:sminrana/MyFirstRepoOne.git

    Now create a txt file in the MyFirstRepoOne directory and add any text. 

    Run this command to know your git status

    git status

    Mine looks like this, my txt file name is any.txt. 

    Add this txt file in git by running this command

    git add any.txt

    Then run git commit command

    git commit  -m "My first git commit message"

    Finally push your changes to the GitHub server

    git push origin master

    You can download this article as PDF

    Download as PDF

    Spread the love
  • Capture first frame of the video as an image on iOS and macOS in swift

    Capture first frame of the video as an image on iOS and macOS in swift

    import Foundation
    import Cocoa
    import AVKit
    import AVFoundation
    
    let asset: AVURLAsset = AVURLAsset.init(url: "URL OF ANY VIDEO local/remote")
    let imgGenerator: AVAssetImageGenerator = AVAssetImageGenerator.init(asset: asset)
    imgGenerator.appliesPreferredTrackTransform = true
                
    imgGenerator.generateCGImagesAsynchronously(forTimes: [NSValue(time: CMTime.zero)]) { (_, image, _, res, error) in
                    
                    if error == nil {
                        DispatchQueue.main.async {
                               let imageView = NSImage.init(cgImage: image!, size: NSSize.init(width: 180.0, height: 180.0));
                        }
                    } else {
                        DispatchQueue.main.async {
                            // Some other fallback image
                        }
                    }
    }
    
    Spread the love
  • NSTableView custom highlight color with NSTableRowView

    Getting the right color when you select NSTableView’s row was frustrating for me since I didn’t know how to do it properly. But it is really simple, all you need to do is having a class inherit from NSTableRowView and override its method drawSelection(in dirtyRect: NSRect).

    import Foundation
    import Cocoa
    
    class MenuTableRowView: NSTableRowView {
    
        override func drawSelection(in dirtyRect: NSRect) {
            if self.selectionHighlightStyle != .none {
                let selectionRect = NSInsetRect(self.bounds, 2.5, 2.5)
                
                if let color = NSColor.init(named: NSColor.Name("menu_table_selection_color")) {
                    color.setFill()
                }
                
                let selectionPath = NSBezierPath.init(roundedRect: selectionRect, xRadius: 0, yRadius: 0)
                selectionPath.fill()
            }
        }
        
    }
    

    Change menu_table_selection_color value in Assets.xcassets file.

    Custom NSTableRowView

    Now go to your NSTableViewDelegate’s method add your custom NSTableRowView.

     func tableView(_ tableView: NSTableView, rowViewForRow row: Int) -> NSTableRowView? {
            return MenuTableRowView()
    }

    Here you can see how my Storyboard looks like. Table view highlight value must be regular.

    Spread the love